Showing posts with label Water Fun. Show all posts

Frozen Paint Art - COOL Fun on a HOT Day!

I can hardly believe that our summer is coming to an end! :(

My big girl starts Kindergarten in 2 WEEKS! Yikes!
Although school may be starting - summer is as HOT as ever!

We had so much fun exploring our water & ice themed week -
the Lil Divas were sad to see it end!

I had promised them we would try our Frozen Paint Art again
since the last time we ended up with melted paint trying to transport it in this heat!

This time the paint went straight from the freezer to paper &
it was a HUGE SUCCESS!

I just had to share because the Lil Divas had so much fun &
created so many masterpieces!!!


Aren't they great? :)

It was so easy too -
Here's What We Did:
I poured tempra paint into an ice cube tray. The Lil Divas opted for rainbow colors. I did not dilute with water as we wanted bright and bold colors for our paintings. I put the paint in the freezer for about 20 mins and let it begin to harden. Then I added the popsicele sticks (so they would remin firmly upright) and let the paint freeze overnight. The next day we had our frozen paint & were ready for some fun!


The Lil Divas painted on white contact paper (it's nice and sturdy!)


The frozen paint lasted a nice long time since we were working indorrs.
They had the opportunity to create many, many works of art :)

While my Oldest Diva was busy creating
picture after picture of hearts, flowers, trees, etc....

My Littlest Diva could not resist getting in some fingerpainting.
She loved the cold paint on her hands best. :)


This really is a fun & easy project that is suited to many age levels.
I know we will be visiting this again sometime soon.

Just look at all the great Frozen Paint Masterpieces the Lil Divas created!


As a special treat after all their hard work we decided to make some
Frozen Fruit Pops. I blended some mixed berries & yogurt and froze it in small dixie cups w/popsicle sticks. YUM! These were a hit & we have made several batches since.


Happy Frozen Painting!
Bern

Preschool Science: "COOL" Ice Art for Little Hands

We had so much fun exploring ice & water last week!
The Lil Divas were sad to see our theme come to an end.
Of course even though we have moved on to our newest theme (zoo animals) - the curiosity, explorations & fun never end.

The last activity I would like to share was a "cool" one! :)

We combined a little Science Activity + Art and came out with some "Cool" Ice Art.
(This activity was inspired by a post I saw on The Artful Parent)


What You Need:
balloons
water
measuring tape
food coloring
paper & pen (for older preschoolers)

*For younger tots you can just skip ahead to the art part of the activity if you don't think they'd enjoy or get the experiment part. Honestly my Lil Divas had so much fun with this - you must try it!* 

What We Did:

1. We filled up balloons with water and then measured them.


2. I made a simple data collection table and we recorded measurements for each balloon.


3. We put the water balloons in the freezer overnight


4. The next day the Lil Divas were running to check on their balloons!
They were so excited to see that they were frozen and so heavy!!!


5. We measured the water balloons and found that they were bigger!
The solid ice had expanded the balloons size!

The Lil Divas were most impressed with how much heavier they were in ice form.
I really wished we had weighed them so we knew just how much heavier they got!
That would definitely be an addition I'd suggest to anyone that is going to try this!

We had these large blocks of ice & the Lil Divas loved playing with them!


I just knew we had to do somehting with them and the Oldest Diva suggested we paint them. I'm sure our frozen paint activity had her mind going & I was wondering how we could do it.

Then I remembered an activity I'd recently seen about ice & salt! :)

So, out came the salt & the fun began!

6. Pour salt directly onto ice block.
Notice the Lil Divas were very generous with the salt. :)

Instantly the ice started to crackle & pop and lots of little craters were formed!
The Lil Divas were in awe.


7. Drop food coloring into the holes
Again, notice we were very liberal with the food coloring.
I tried to get them to just add a few drops but they were not to be stopped! :)


Can you blame them?
Look at how pretty this looks.


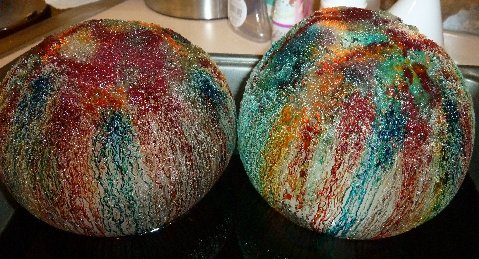
As the food coloring slipped through the holes and combined with the melting ice it created a wonderful work of art to behold. The inside of the ice was alive with color.


We left our works of art out for the entire day.
The Lil Divas enjoyed checking up on it and watching it melt.
A very "cool" art project!


Bern

ABC Fun: W is for Whale Spouting Water - Hands-on Learning & Crafts

It's been awhile since I've blogged one of our ABC Crafts
(summer has been so busy)
but this one was too cute not to share with you!
The Lil Divas really got a kick out of how it turned out.

First, we spent some time on the letter Ww.

Hands-on Letter Play:
I had the Little Divas construct the letter out of our: 

Wikki Stix Alphabet Fun Cards


our foam shapes from the fun intercative book:

How to Build an A


Note: The girls have loved working from this book since we bought it in December-
if you have a toddler and/or preschooler I highly recommend it!


and even some craft sticks at the Oldest Diva's insistance


Letter Recognition Fun:
We use these super & simple letter finding sheets from BeginningReading.com.
The Lil Divas find the target letter (W&w)
and stamp them with our Do-A-Dot Rainbow Markers


Handwriting Practice:
Then, the Lil Divas worked on writing the letters W and w.

I had them finger write the letters W & w in water -
actually it was blue paint in a ziploc bag but they seriously LOVED this activity
and I did not get pictures :( my camera battery was dead!

We also used this simple handwriting sheet from First-School
to practice writing the letters. It coordinated with our theme perfectly.


Phonics Fun:
The Lil Divas sorted picture cards into Ww and Not Ww.
I found them on SuperTeacherWorksheets.com.


The Craft: W is for Whale Spouting Water
This was a hybrid of our Ocean & Water Themed Fun the past few weeks.


What You Need:
white and blue cardstock or heavyweight construction paper
blue tissue paper strips
gray paint (we mixed black & white)
wiggly eyes
glue

What We Did:
I used a block W template I had -
 I've had it forever so the original source is long forgotten but these are easily found online

Then I made a whale head & tale to fit the letter.
This is also easily done
(mine is far from perfect but if you need the template just ask & I will gladly share it)

The Lil Divas painted the W and the whale parts using gray paint & sponges


After allowing ample drying time -
cute out all pieces and glue to form a whale.

Note: ours painted papers did roll up a bit so
I put them between some heavy books and they were good as new


I let the Lil Divas decide where they wanted to put the head & tale pieces.


For the souting water I used blue tissue paper and we cut a few strips and glued it under the head so it looks like water was shooting out from the top of the spout. Cute!


Book:


Hope you enjoyed our Letter W craft!
Bern

Water Fun: Frozen Finger Painting

The Lil Divas are fully enjoying our water themed week!
Each day they excitedly ask about what I have in store for them
& can't wait to get to the fun.

The other day we had a playdate with some dear friends &
the Lil Divas insisted we bring along our day's activity - Frozen Finger Painting!


I have seen this on many blogs lately & knew we had to try it!
There is no better time to play with something cold
than during this sizzling summer heat.

I opted to use our tempera paints versus food coloring or water colors.
I wanted to ensure bold colors on our canvas
and this seemed like the best way to do it.


What You Need:
 tempra paint in desired colors
(we also used some gold glitter paint)
ice cube tray(s)
water
pipette
stirrer or paintbrush for mixing
straws or wooden popsicle sticks

What We Did:

The Prep Work:
1. I poured paint into each section of the ice cube tray

2. Using the pipette I added water
(so as not to overflow & mix colors) and mixed.

3. I put the ice cube tray into the freezer for about 30mins.

4. I added the straw halves to each color and put back into the freezer overnight.


The next day they were nice & frozen! 

The Craft:
Note: I decided to use a thin canvas for this painting activity -
mostly because I was worried the paper would tear as the ice paint melted.

After driving in the hot car for 15-20 mins to get to our detination
our ice cube paints had begin to melt :(

We put it back into the freezer for a few mins. but the kids wanted to get outside.
We got their bathing suits on and went out
& to my dismay the ice paint was melty! :(

Here's the 1 picture I got of the actual ice paint being used
and even here you can see my Lil Diva had "painted" her hand
and was making a handprint on her canvas!


The Ice Painting That Wasn't:

Melty ice paint = straws falling off the already melting cubes.
Melty ice paint cubes = squished paint on little hands
and squished paint in little hands led to "cold"frozen finger painting instead!


We ended up with lots of this!


Not my original intention but we made the best of it
& the kids had fun with it anyway since MESS=FUN!

To show that this idea can be fun for children of all ages
I have to share with you that even my friend's 1 year old got in on the fun!


She was my "star" participant!
She LOVED getting the cold squishy paint on her hands
and smearing it all over the canvas!
She kept asking for more.
It was so cute & her finished product was awesome!


Here are the finished "fingerpaint" materpieces:


I have to admit I feel like I need to do this again. 
Even though the kids enjoyed it,
I can't help feeling like we still need to try our original idea of frozen painting.
So be on the look out for that because it will be coming!


Books:


Bern