Showing posts with label ABC Fun B is for Bear. Show all posts

Teddy Bear Day - Learning Fun, Math, Games & a Picnic!

To conclude our Bear Theme we had a "Teddy Bear Day"! Afterall, you can NOT talk about bears and not include those lovable stuffed versions!

Here's a peek at all the fun we had learning & celebrating (Warning: we did A LOT!)

Teddy Bear Ordering & Measuring
(courtesy of Kinderplans.com <--printables)

Ever since our Dr. Seuss The Foot Book Measuring Activities the girls have been into measuring so I knew these cute bear cards would be a hit & I was right!

First, they put them in order from largest to smallest as a quick ordering activity.........


Then, we mixed them up again & the Lil Divas used Unifix Cubes to measure the length of each teddy bear


and write the number on the back of the card.

Finally, they measured real teddy bears - this was definitely the highlight of the measuring activity!


This was a great ordering (smalles to largest), estimating (they had to decide how many cubes they thought were needed for the length of each bear) measuring (they had to find the correct of number of unifix cubes needed to cover the length of each bear), couting (they counted the final number of cubes) & number writing (wrote the number for the corresponding cubes used) activity.

Letter Bb Hunt (courtesy of BeginningReading.com <--printable)

The Lil Divas had to identify/find all the letter Bb's and cover them with Bingo chips


Letter B Foam Puzzle (courtesy of foam letters template - unfortunately I did not save the original source - sorry! I am trying to locate it to give credit)


Teddy Bear Roll & Stamp Game (courtesy of pre-kpages.com <--printable)

We used fun Numbered Foam Dice to play. The Lil Divas would roll their dice, identify the number and stamp the corresponding bear using a Do-A-Dot Marker (they LOVE these & we use them often!).


Teddy Graham Math

I love using fun food/snacks as a manipulative. It really interests the kids and it's easy & fun to both find and use.

For this activity we used teddy graham cookies to count, sort & order teddy bears.

I used teddy bear cut-out cards (purchased from an educational store) and
1. wrote the numbers 1 thru 10 on them.
2. I mixed them up
3. The lil divas took turns turning over a card and identifying the number written on it
4. Then, they counted out the correct number of teddy grahams & placed them on the card
5. Finally, after all the cards were done they put them in order from #1 thru #10.


Teddy Bear Picnic

This was by far the FAVORITE activity of the day!

We gathered all the teddy bears that the girls wanted to invite to our picnic and set them up on a large blanket in the play room. The Lil Divas helped set up plates and food for each bear.


The Lil Divas got to enjoy some teddy grahams and juice during the picnic. We did this after lunch so they weren't hungry. I had planned on a picnic lunch with bear shaped sandwiches but we ate out with the hubby so I had to alter our menu :)


The Lil Divas played Three Hungry Bears - this is a file folder game found in this File Folder Games book that I had from when I was working in the classroom & it was perfect for today.

You sort the picnic food (small, medium & large) that belongs to each bear.


We played a Color Bears Matching/Memory Game (courtesy of ABCTeach.com)


Gummy Bear Math FUN (all printables for this activity are courtesy of Lily and Oak Blog - I was super excited to stumble across her awesome printables because I was going to make some myself & she did a much better job than I would have been able to accomplish. She also had some ideas that I never thought of & everything was a huge hit!)

Gummy Bear Graphing


Gummy Bear Patterning


* We ran out of certain colors due to the Lil Divas munching on the manipulatives so we made our own patterns at the bottom based on the colors we had left :)


Gummy Bear Addition & Subtraction


Book:

Teddy Bear's Picnic by Jimmy Kennedy

Overall. it was a fun day and the perfect way to end our Bear Theme! Hope you enjoyed our theme along with us!

Don't forget to check out ALL of our Bear Activities HERE (brown bear, polar bear & panda bear)

Bern

**I have linked this to Tot Tuesdays and Show & Tell  **

Brown Bear, Brown Bear - Even More Fun With Bears!

Today, I'd like to share our Brown Bear activities, crafts, snacks & fun with you.

Books:

We focused on Eric Carle's


and


Other Great Brown Bear Books:
Goldilocks and the Three Bears
Bear Snores On
We're Going on a Bear Hunt: Anniversary Edition of a Modern Classic

Bear French Toast


Craft - Textured Brown Bear


What You Need:
Bear Template
Blue Construction Paper for Background
Piece of Green Construction Paper for Grass
Brown Paint
Coffee
Wiggly Eyes
Small Black Pom Pom
Glue
Scissors

What To Do:
1. Cut out Bear Template - I drew this myself  (will try to get it scanned and posted) and used cardstock so it would handle the weight of the paint and coffee


2. Paint Bear using brown paint - I encouraged the lil Divas to cover it entirely and make it wet - they were happy about that!


3. Cover wet bear with cofee completely - be careful when you shake it off, I find it best to wait until it dries a bit so that more coffee sticks on than shakes off


4. Add Wiggly Eyes & Nose - then let it dry! The less you move & touch it the better


5. Prepare background paper - cut green piece to look like grass, be sure to leave room at the bottom for gluing - do not cut all the way to edge!


6. Behold your Textured Coffeee Bear


Craft: Paper Plate Brown Bear


What You Need:
6in paper plate
brown paint
brown construction paper
black construction paper
glue
wiggly eyes
scissors

What To Do:
1. paint 6in paper plate completely with brown paint


2. Make face by adding ears. wiggly eyes & pom pom nose and mouth cut out


Learning Fun

Number Order 1-10 Practice - for this I bought bear cut out and wrote the numbers 1 thru 10 on them. I mixed them up and had the Lil Divas put them in numerical order. You could easily do this with bear cut outs out of brown construction paper too.


ABC Upper/Lower Case Match - I used large and small bear cut outs that I had purchased and wrote the Capital letters on the larger bears and lower case letters on the small bears. The girls then had to match the "Baby" Bears (lower case letters) to the correct Mommy/Daddy Bear (Capital letters).


Hope you enjoyed our Brown Bear fun!
Don't forget to check out our:
Eric Carle Theme, and our Polar Bear and Panda Bear activities too!

Bern

**I have linked this to Read, Explore, Learn , Tot Tuesdays, For the Kids Friday, Preschool Corner and Show & Tell  **

Polar Bear, Polar Bear - More Fun with Bears!

Over the weekend we spent time learning about my fave animal - the Polar Bear!

I have been awed by these powerful and yet adorable animals for as long as I can remember so it was fun for me to share them with my Lil Divas.

Books we read:

We of course focused on Eric Carle & Bill Martin Jr.'s:


and a few other Polar Bear faves:


My Little Polar Bear
by Claudia Rueda - cute basic polar bear facts are given in the dialogue of the story

A Polar Bear's World (Caroline Arnold's Animals)
by Caroline Arnold - great polar bear facts given in story form

The Three Snow Bears
by Jan Brett - a cute polar bear take on Goldilocks & the 3 Bears

Snow Bear (Soft Touch Book) by Piers Harper

Hush Little Polar Bear
by Jeff Mack

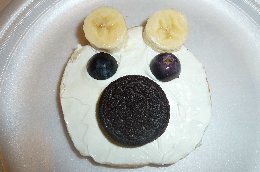
Polar Bear Snack:

What You Need:
1 oreo cookie
1 dark grape (cut in half)
cream cheese
1 half of a bagel or 1 rice cake
2 banana slices

Assemble as pictured below to make your yummy polar bear snack - the Lil Divas loved these!


Circle Polar Bear Craft:

What You Need:
Color Construction paper (for background)
White Construction paper
Black Construction paper
2 wiggly eyes
Black marker
Scissors
Glue

What To Do:
Prep:  I used this circle polar bear template from DLTK-kids.com
- use the larger sized circle for the head (cut out 2 white circles)
-small circles for ears & nose (cut out 2 white circles & 1 black circle)

**Note: I cut out the circles myself because I knew we would be pressed for time on the day of the craft but if I had more time I would have let the Lil Divas cut them out & gotten in some great scissor skills & fine motor exercise**

Step 1: Glue 1 large circle onto background paper

Step 2: Glue 2nd large circle slightly onto other circle (see below)


Step 3: Glue 2 small circles onto top circle as ears (see below)


Step 4: glue small balck circle onto bottom head circle as nose (see below)


Step 5: Add wiggly eyes


Step 6: Add mouth using black marker (see below) and behold finished polar bear face


Puffy Paint Polar Bear Craft:

What You Need:
Foam Shaving Cream
Glue
Background paper
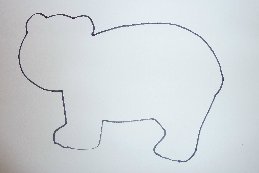
Polar Bear template
wiggly eyes
black pom pom ball

What To Do:
Prep: to make puffy paint mix equal parts shaving shaving cream with liquid glue - I find it best to do this right before you need it or it starts to harden and it's a little harder to paint with.

Step 1:  Cut out Polar Bear Template & glue onto background paper

*I apologize but I don't know where I originally got the great template from. I have had it for years in my teaching files :(  & always make sure I save it because it's perfect for both polar bears & brown bears. If you would like it e-mail me and I'll happily pass it along but I hate to upload it when it's not mine & I can't give credit to where I originally found it*


Step 2: Paint over template using puffy paint - this will give it the look of  fluffy "fur"


Step 3: Add wiggly eyes & black pom pom nose and let dry


**Note: we added snowflake stickers because the girls wanted to use them but you could also use the excess puffy paint to add the appearance of snow onto the background paper

Handprint Polar Bear Craft: a cute keepsake craft

What You Need:
white paint - we used tempra
background paper
black marker

What To Do:
Step 1: Paint child's hand (of choice) with white paint - be sure to cover completely


Step 2: Press down firmly onto background paper - be sure to press down on the middle of the palm


this will give you the basic polar bear body as below


Step 3:
- re-paint thumb and use it to make polar bear's head on thumbprint of hand
- re-paint pinky and use it to make 2 small ears on newly added head
- re-paint pinky again and use it to make tail
- let dry


Step 4:  use black marker to add eyes, mouth, outline of inner ears and toes/nails to complete the polar bear


B is for Bear Sticker Fun:

What You Need:
white paper
polar bear stickers (you can use any bear stickers, beansor even buttons to showcase the letter Bb work with what you have)

What To Do:
Prep: Draw an upper case and lower case Bb onto the white paper


Step 1: Have the child place the stickers (or whatever you are using) on the outline to make the letters Bb


**Note: I always monitor and encourage them to follow correct letter formation when doing these - it's great practice for writing the letter


As you can see, we had great fun with Polar Bears! There's so much more you can do but with St. Patty's Day and Spring Break this coming week - I know I have to limit myself because we won't get to everything!


Don't forget to check out our Eric Carle Theme, Brown Bear and Panda Bear activities!


Bern

**I have linked this to Read, Explore, Learn , Tot Tuesdays and Show & Tell  **