Showing posts with label science experiments. Show all posts

Preschool Science: "COOL" Ice Art for Little Hands

We had so much fun exploring ice & water last week!
The Lil Divas were sad to see our theme come to an end.
Of course even though we have moved on to our newest theme (zoo animals) - the curiosity, explorations & fun never end.

The last activity I would like to share was a "cool" one! :)

We combined a little Science Activity + Art and came out with some "Cool" Ice Art.
(This activity was inspired by a post I saw on The Artful Parent)
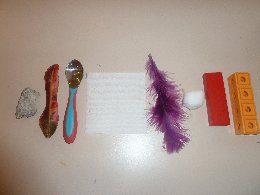


What You Need:
balloons
water
measuring tape
food coloring
paper & pen (for older preschoolers)

*For younger tots you can just skip ahead to the art part of the activity if you don't think they'd enjoy or get the experiment part. Honestly my Lil Divas had so much fun with this - you must try it!* 

What We Did:

1. We filled up balloons with water and then measured them.


2. I made a simple data collection table and we recorded measurements for each balloon.


3. We put the water balloons in the freezer overnight


4. The next day the Lil Divas were running to check on their balloons!
They were so excited to see that they were frozen and so heavy!!!


5. We measured the water balloons and found that they were bigger!
The solid ice had expanded the balloons size!

The Lil Divas were most impressed with how much heavier they were in ice form.
I really wished we had weighed them so we knew just how much heavier they got!
That would definitely be an addition I'd suggest to anyone that is going to try this!

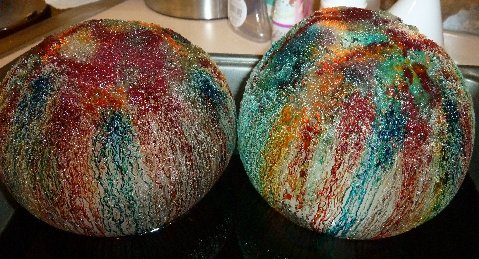
We had these large blocks of ice & the Lil Divas loved playing with them!


I just knew we had to do somehting with them and the Oldest Diva suggested we paint them. I'm sure our frozen paint activity had her mind going & I was wondering how we could do it.

Then I remembered an activity I'd recently seen about ice & salt! :)

So, out came the salt & the fun began!

6. Pour salt directly onto ice block.
Notice the Lil Divas were very generous with the salt. :)

Instantly the ice started to crackle & pop and lots of little craters were formed!
The Lil Divas were in awe.


7. Drop food coloring into the holes
Again, notice we were very liberal with the food coloring.
I tried to get them to just add a few drops but they were not to be stopped! :)


Can you blame them?
Look at how pretty this looks.


As the food coloring slipped through the holes and combined with the melting ice it created a wonderful work of art to behold. The inside of the ice was alive with color.


We left our works of art out for the entire day.
The Lil Divas enjoyed checking up on it and watching it melt.
A very "cool" art project!


Bern

Water Theme - Preschool Physics: Exploring Sink vs. Float

Will an object sink or float? 

It's a fairly common science experiment that helps teach children about weight 
and it was a perfect addition to our water themed fun this week.

What You Need:
plastic see through container that can hold water
objects of varying weights
optional: (this is best for older preschoolers)
a sheet of paper to keep track of findings
I folded a paper in half and wrote sink in one column and float in the other.


What We Did:

1. I filled a see through plastic container with water

2. We gathered household objects and toys of varying weights


3. I let the Lil Divas take turns picking an item to put into the water.

4. Each had the opportunity to hold the item and predict if it would sink or float.

5. I wrote their predictions on the chart and then 
I let them place it into the water to test their predictions


They were so excited when they were correct!


The one that interested them (& stumped them) the most
was our small Dora & Diego figurines!


They felt like they were relatively the same weight.
Yet, Dora floated along the top & Diego sunk!


The Lil Divas were so curious. 
They kept taking them out & putting them back into the water over and over again. 
It was so cute to see them trying to resolve it.


Books:


Have you done any fun experiments using water with your preschooler?

Bern

Fee! Fie! Foe! Fum! - Planting Your Very Own Beanstalk is Fun!

No flower/garden/seed theme would be complete without experimenting with Lima Beans! They are just so much fun to watch and they quickly grow & change which is wonderful for kids to witness.

Fee! Fie! Foe! Fum! Here are the Books We Read:

I really like this version of the classic tale. My oldest Diva scares easily and I was worried about some of the more gruesome versions of the Giants in some of the other books. This one was perfect and I highly recommend it for kids.

This was a cute & funny story which also introduced some gardening vocabulary

Fee! Fie! Foe! Fum! Planting a Beanstalk Sure is FUN!

You Will Need:
lima beans (we used 5 in each baggie)
a clear platic storage bag, a clear plastic cup or a glass jar (we used a baggie)
wet paper towel

What We Did:

1. We sprayed a paper towel so that it was wet but not soaking


2. We placed the paper towel into a baggie (we folded the paper towel in half and then in half again to fit)
3. We sprayed the lima beans with water before placing them in the baggie to get them going

4. I taped the baggies to a window and we set out to observe them every day.

 Day 1: the beans got noticeably larger/fuller (I did not get a picture) as they absorbed water from the napkin

 Day 2: the seed swelled and burst open


 Day 3: You can see the lima beans bursting open through their hard outer coating


Day 5: Roots are now clearly visible


Day 7: Leaves sprouted


This is a great experiment to do with toddlers/preschoolers because it is simple with very little maintenance - just keep towel moist - and marvel at the day to day growth! The Lil Divas had such a good time with this.

Have you and your child(ren) or students experimented with lima beans? I would love to hear about it.

Hope you enjoyed watching our beans sprout with us! We are continuing to watch them grow and  the Lil Divas are curious as to what will happen.

Fee! Fie! Foe! Fum! Wonder if we'll grow a beanstalk tall enough to climb towards a sky high kingdom?

Bern

F is for Flower - How Does Water Move Through a Stem?

Experiment: Coloring a Flower

What You Need:
White Carnations ( 1 for each color you will use)
food coloring in assorted colors (we used red, blue, yellow & green)
clear plastic cups or glasses
water
scissors


What To Do:

** Hypothesis - explain what you are going to do and have your children tell you what they think will happen. The Lil Divas hypothesized that the flower's stem would change color since it was sitting in the colored water! **


1. Fill glasses 1/3 to 1/2 way with water and add enough food coloring so that the color looks deep/dark.


2. Cut the end of the flower's stem and stand flower in colored water


3. Observe leaf after 1 hr. You should see the petals becoming tinged with color

4. Observe throughout the day - you should see petals gain more and more color until you have a colored flower.


5. Discuss results of experiment with your child(ren) -
How did the white carnation change color? Why?
The stem transports water and minerals upwards from the roots through the plant. Since we colored the water we saw how it traveled through the stem upward to the petals.

The Lil Divas LOVED this experiment. They were fascinated by the changing color of the petals. The experiment really helped them see how water travels through the stem to the other parts of the plant.

*****

We also planted our flower garden today! :) Keeping my fingers crossed that we get some flowers! I have a notorious black thumb but I am hopeful that these will grow. One thing is for sure - we certainly enjoyed planting together.


Since we planted sunflowers today one of the books I read was:
Sunflower House by Eve Bunting


The other book I read was:
My Garden by Kevin Henkes - this is a fun imaginative book about what a lil girl dreams would be in her ideal garden. We had fun imagining and discussing what would be in our "dream" garden - from cupcake trees to seashell and butterfly flowers. :)


*****

The Lil Divas also made letter Ff out of Flower stickers:


and practiced writing the letter Ff using a handwriting printable from First-School.ws

Hope you enjoyed our experiment, the sneak peek at our (hopefully) future flower garden, books and letter Ff activities! More to come as we continue to explore Flowers this week!

Bern

** linking this to Childhood 101 - We Play!Sharing Time,  Get Crafty,  Read, Explore, Learn , For the Kids Friday, and Preschool CornerFeed Me Books Friday  **

W is for Wind: Experiment - Can the Wind Move It?

The arrival of Spring brings lots of windy days. Today we explored the letter Ww and the different types of things that wind can move with an easy and fun at-home experiement.

Here is a recap of our activties:

Letter W Do-a-Dot Page (from Confessions of a Homeschooler)


Letter Ww Hunt (from Beginning Reading)


Letter Ww Word Hunt (by Mom to 2 Posh Lil Divas)


Wikki Stix W's

Letter W Foam Puzzle


Experiment: Can the Wind Move It?

 What You Need:
 Wind Experiment Template (Mom to 2 Posh Lil Divas)
rock
leaf
spoon
tissue paper
feather
cotton ball
block
lego
scissors
glue
straws

What To Do:
1. The Lil Divas cut out the pictures of the items were using in our experiement.

2. They hypothesized which objects would move with wind blowing and which ones would not move by putting the corresponding pictures in the correct column on their sheet (do not glue)

3. One at a time I presented them with the objects (place on the floor or table top) and they used their straws to blow wind at the objects.


4. After we went through all 8 items the Lil Divas went back to their sheets and checked if their hypothesis had been correct. They made corrections if necessary and glued the pictures onto the correct column.

We had a fun day exploring wind! Enjoy!

Bern